AceProject enables users to fill out timesheets in order to record their work hours. Depending on their access rights, users can fill out timesheets manually (using standard timesheets) or automatically (using the “Time Clock” module).
Moreover, users can be submit their timesheets for approval to a project manager. All work hours can be viewed in time reports, which can also be exported to Excel for accounting or payroll use.
BEFORE YOU GET STARTED
Set the “Week Management” Parameter in Accordance with your Needs
We strongly recommend that an administrator in your account sets the “Week Management” parameter in accordance with your needs, before anyone starts filling out timesheets, as this parameter cannot be changed if timesheets exist. This parameter actually defines a typical work week, that is, on which day it begins and ends. This prevents time management conflicts between AceProject’s time tracking and your organization’s internal procedures at this level. The “Week Management” parameter can be set under Administration => Account > Edit Account, in the Preferences section.
The options available are the following:
- Sunday to Saturday
- Monday to Sunday
- Saturday to Friday
Filling Out Timesheets
Users can be granted the privilege to fill out timesheets either manually (also known as the “Timesheet” mode), automatically (“Time Clock” mode) or both ways.
Manually – Through one’s Weekly Timesheets
The most used time entry mode is manual, using a standard timesheet. Basically, a user creates a week (i.e. a timesheet) and creates time entries as time items. A timesheet can contain an unlimited number of time items, to accommodate every organization’s needs. Some prefer entering a time item for every job done daily or weekly while some prefer entering one time item per day, for all work done during that day.
Only users with the proper access rights can fill timesheets manually.
Here is the procedure to do so:
- Go to Home => Time > My Time.
- Use the navigation tools to display the weekly time sheet you wish to edit. AceProject will then display all existing time items in the selected week. AceProject might also show “Proposed Time Items” in a light blue area below the “real” time items. Proposed Time Items are suggested based on tasks and projects you recently recorded time on.

- There are numerous ways you can add or edit time on your weekly time sheet…
- You can add or edit time on existing time items directly in My Time page. You may do the same with “Proposed Time Items”. Once you add time to a proposed time item, it becomes a “real” time item.
- If you wish to edit an existing time item but not only the time it contains, click its “Status” link to enter Edit mode.
- If you wish to add a new time item to your current week, click on the “Add time to this project” button. You will subsequently be able to select a task (if need be), a Time Type and enter time.
- Click “Update” or “Save” when you are done.
Manually – Working Through a Project to Add Time to the Current Weekly Timesheet
Click on the right edge of the Project Tab and select “Add Time” in the pulldown menu.
AceProject will then automatically create a new time item in your current weekly timesheet. You will then be able to select the task in that project or leave the Task field blank (to record project hours), select a Time Type and enter hours for any day of the week.
Manually – Working Through a Task to Add Time to the Current Weekly Timesheet
Open a task by clicking on its Summary link in a task list. In the task Edit screen, click on the “![]() Add Time” option in the right pane.
Add Time” option in the right pane.
AceProject will then automatically create a new time item in your current weekly timesheet or open an existing time item associated with the task in your current weekly timesheet (if one exists). You will then be able to add or edit hours on the task for any day of the week.
Manually – On Behalf of Another User
Administrators and Project Managers can record time on behalf of other users through the time approval areas.
Here is a procedure to do so:
- Go to Home => Time > Time Approval.
- Click on the “Add Time Item” button.

- Select the user, project, task and time type.
- Record hours in the time boxes.
- Click on “Save”.
Automatically – Using the Time Clock Module
The Time Clock module is an alternative time entry mode in AceProject. It’s a time saver as it enables users to have their timesheets filled out automatically.
Only users with the proper access rights can use the Time Clock module.
Here is the procedure to do so:
- Click on the Alarm Clock icon near the upper right-hand corner of the screen, (alternative procedure: open a task from any task list by clicking its Summary link and click on the “Start Time Clock” option located in the right pane).
- Select the project and task you are working on (if necessary) and a Time Type. Click the “Start” button to start the time clock.

- To stop the timeclock, click once again on the Alarm Clock icon near the upper right-hand corner of the screen.
- Apply any necessary changes (such as adding a comment) and click the “Stop” button when you are done. The “Start” and “End” times as well as the elapsed hours are automatically recorded in your current weekly timesheet.

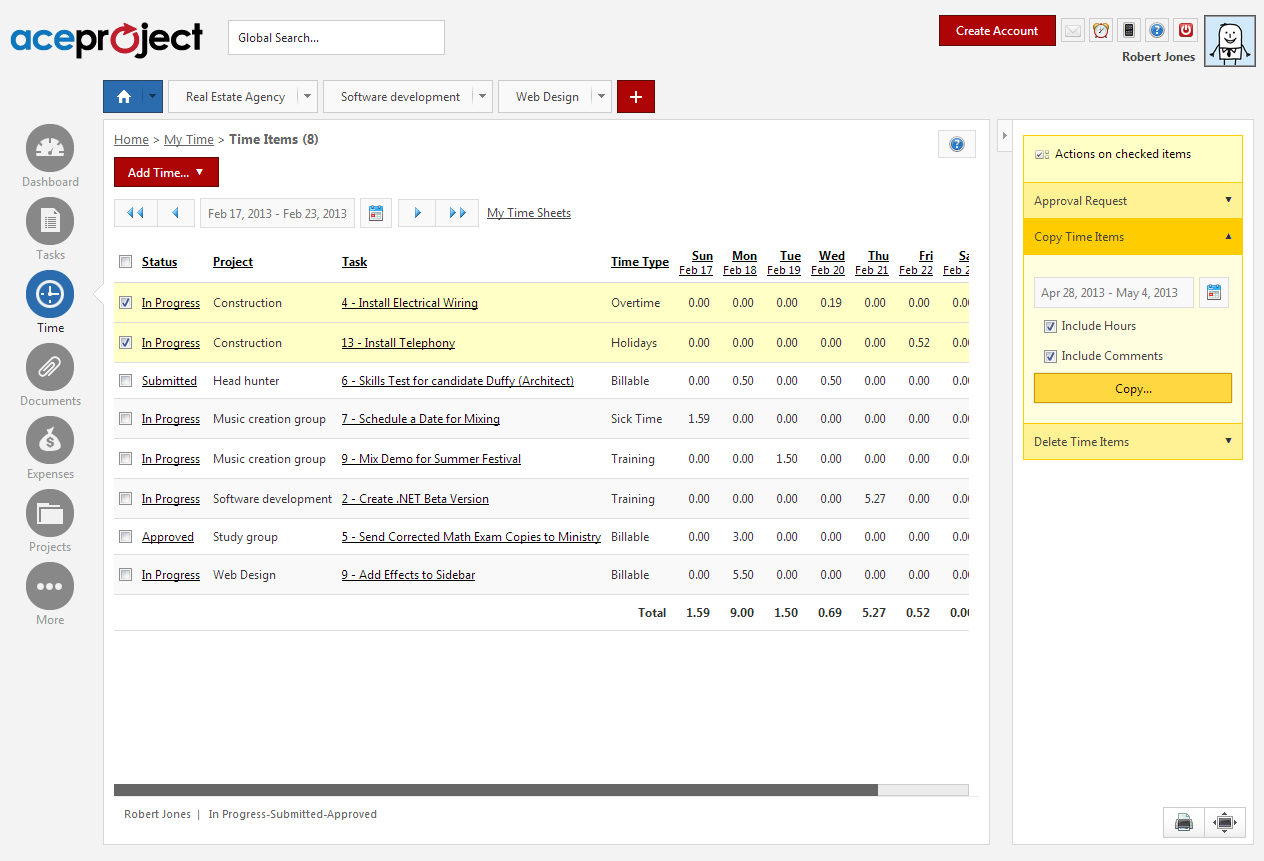
Copying time items from past weeks
If you must record time on the same tasks and projects from one week another, copying time items from a past week can be a timesaver. When you copy time items, you have the option to copy the time in those items as well or not (thus, in the latter case, creating zero hour time items in the target week).
Here is the step-by-step procedure:
- Select Home => Time > My Time .
- Use the navigation bar to reach the week that contains the time items to copy. Alternatively, click on the “My Time Sheets” option just right of the navigation tools to get a list of your weekly timesheets and then click on the Global Approval Status link of the week that contains the time items to copy.
- Select the time items to copy or use the column header checkbox to select all time items in that week.
- In the “Copy Time Items” section in the right pane, select the target week.
- If you want to copy the time in the selected time items along with the items themselves, check “Include Hours”. You may also copy the time item comments.
- Click on the “Copy” button.
Requesting Time Sheet Approval
All or multiple time items from a weekly timesheet can be submitted for approval to a user who has time approval rights.
Here is the procedure to do so:
- Select Home => Time > My Time.
- Navigate to the weekly timesheet which contains the time items you want to submit for approval.
- Use the checkboxes to select the time items you want to submit for approval.
- In the right pane, in the “Actions on checked items” area, select the user to submit your time items to in the “Send Approval Request to” drop-down.
- Type in a custom message in the “Comments…” box, if needed.
- Click “Send Approval Request” to submit your time sheet for approval.

Approving Time Sheets
Timesheets submitted for approval can be viewed both in the Project tab and Home tab time approval areas. Only administrators and users with the “Time Approval” rights over the project a time item is associated with can view and approve the time item.
Here is the procedure to do so:
- Depending on your access rights and your needs, you may either select Project Tab => Time > Time Approval or Home => Time > Time Approval (for cross project time approval). As an administrator, you can approve any time item, from any project, under the Home tab. If time items have been submitted for your approval, the approval request e-mail you have received contains a link back to the application for the approval of those specific time items (if you’re working this way, skip to step 3).
- In the right pane, apply the necessary filters to capture the time items you wish to approve.
- Select the time items to approve.
- In the right pane, in the “Actions on checked items” section, select the status to set the selected time items to.
- Type in a comment if required. This comment will be included in the e-mail that will be sent to the owner of the time item(s).
- Leave the “Notify” box checked if you wish to notify the user by email about the approval.
- Click “Apply” to proceed.

Once a timesheet is approved, it cannot be edited by the user thereafter.
Producing Time Reports
Time reports enable users to track work hours spent over a given period of time. Depending on their access rights, users can generate time reports from three perspectives: a user can generate a personal time report under the Home tab, a user with the “Time Approval” access right can generate a time report at the project level and, if a user has time approval rights across multiple projects, this user can run a time report across all of these projects in a single operation under the Home tab. Time reports can be exported to Excel or CSV.
There are 3 sections in the time report configuration screen:
- In the “View” section, you may specify how time items are to be presented in the time report. AceProject supports a two-tier breakdown. If one does not want to see time items listed in the time report what would rather simply see totals per breakdown, the “Show only totals and subtotals” option may be selected.
- In the “Fields to Display” section, you may specify the columns you want to see in your time report, their order from left to right as well as the sorting order of time items within a breakdown.
- The “Filters” section allows you to specify a date range and configure your filtering in accordance with your needs.
Once a user is done configuring his/her time report, clicking on the “Generate” button located in the right pane will bring up the time report results. To export the report, click on the “Export” button (Microsoft Excel icon near the top right hand corner of the screen) instead of clicking on “Generate”.
To prevent having to reconfigure a time report from scratch, one can check the “Remember filters” checkbox prior to clicking on “Generate”. The next time you to return to the same time report area, your time report configuration will already be set as it was when you last generated a report in that area.

Time reports may be found under Home => Time > Time Reports and under Project Tab => Time > Time Reports.