Understanding AceProject’s interface is a basic prerequisite for every AceProject user. This page aims at describing the interface’s main elements.

The Header

The header contains the AceProject logo or your own corporate logo, the navigation tabs, the connected user’s full name and several other links and buttons.

The global search box will let you search by keyword among all tasks you are allowed to see. The search is applied on the task Number, Summary, Details and Comment fields.
The “Home” tab provides access to the connected user’s personal and cross-project work area. Clicking anywhere on the Home tab but on its right edge will bring up the Home tab default page. Click on its right edge and a pulldown menu will appear. The options in the pulldown are shortcuts to the most common pages that are otherwise accessible through the Home tab contextual left panel menu.
The project tabs indicate the projects that you have open and allow you to toggle easily from one to another. Each tab bears the project’s name. Clicking anywhere on a project tab but on its right edge will bring up the project’s task list. Click on its right edge and a pulldown menu will appear. The options in the pulldown are shortcuts to the most common pages that are otherwise accessible through the project tab contextual left panel menu.
The “+” button allows you to open projects you are entitled to access or quickly create a project. Click on the “+” button and you may subsequently start typing a project name in the filter field. As you type, AceProject proposes project names that match. You may then select the project(s) you wish to open. If no existing project name matches what you’ve typed, a “Create … as New Project” button appears.
The “Administration” button provides administrators access to the account administration area. This is where administrators will manage users, and account settings, among other restricted configurations.
This button redirects the user to the mobile version of AceProject.

The Left Panel Menu

The left panel menu is contextual. It contains the selected tab’s features and options. The “Home” tab left menu is shown here.
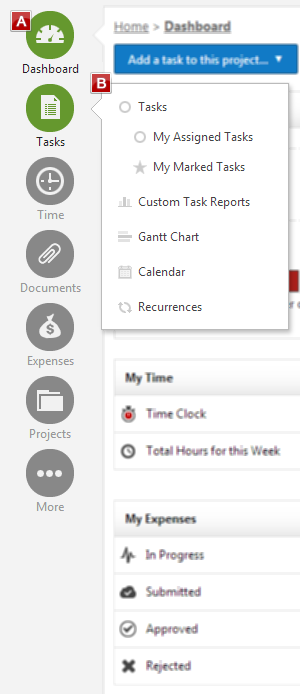
The left menu “main items” represent themes or concepts. Hover your mouse over a left menu main item and sub-items will appear. Click directly on a main item and the item’s default page (usually, the most commonly selected sub-item) will be displayed.
The sub- items can be clicked to access the corresponding features or options.

The List View

When viewing a list of items (i.e. project, task and user lists as well as most reports), you are in “list view”. The task list of a project called “Head Hunter” is shown here.
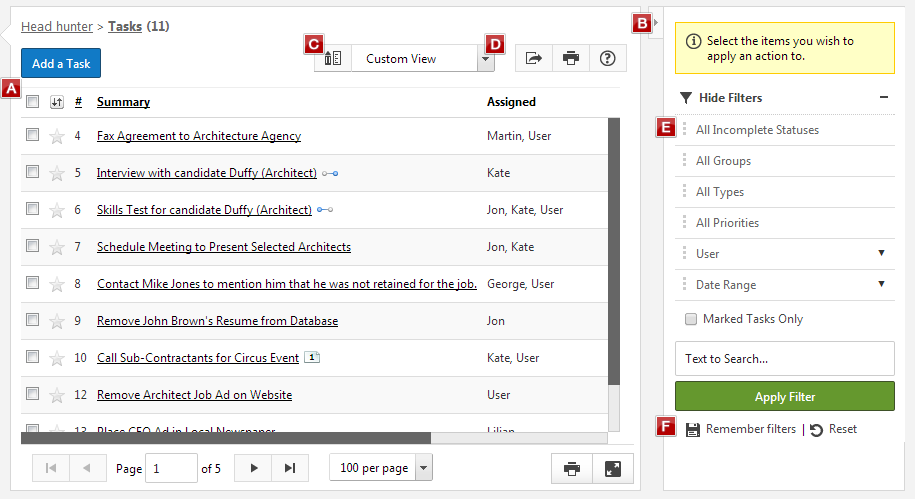
The item checkboxes allow you to select the items you wish to apply a mass update to. Once the items selected, the available options appear in the right panel.
This little tab allows you to show or hide the right panel.
When in “Custom View”, click on this “Show/Hide Columns” button to reach a window where you will be able to select the fields you want to see displayed in your list, their order from left to right across the screen and specify the sorting order of the items in the list.
In this dropdown, you may toggle between your custom view and a set of pre-configured views.
This is the filtering area. The values displayed are the current filter settings. Click on a current value to select another filtering option.
Check this “Remember filters” checkbox and then click on “Apply Filter” to have your current filter settings saved. The next time you’ll return to the same screen, your filtering will automatically be set as you had saved it.

The Form View

When adding or editing a user, a project or a task, you are in “form view” The task “Edit” screen is shown here.
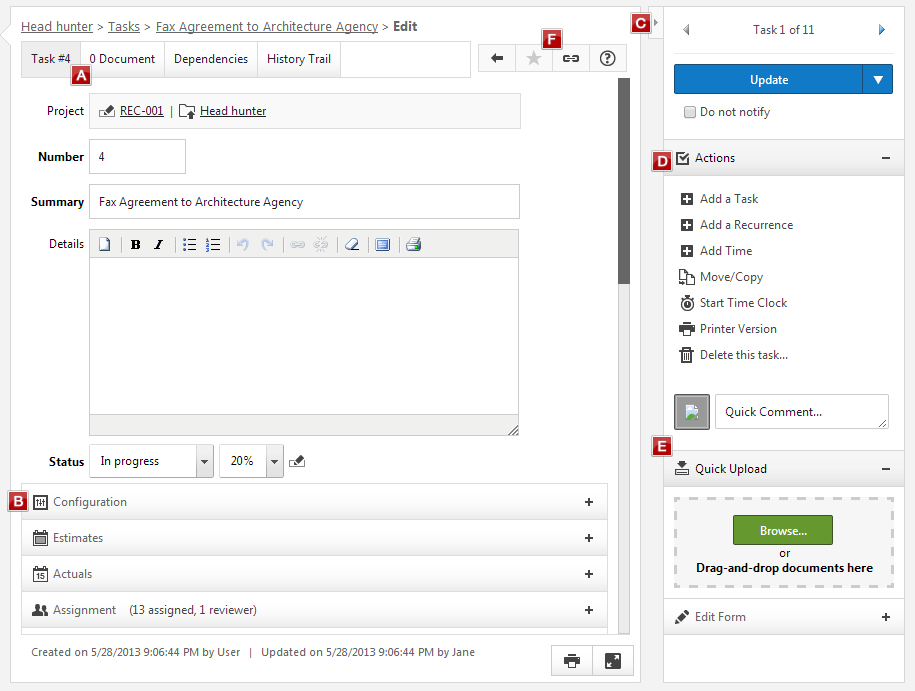
The navigation tabs enable you to toggle from one area to another, within the item.
The form itself is divided into sections which you may directly click on to collapse or expand.
This little tab allows you to show or hide the right panel.
This “Actions” zone in the panel displays links for common actions one might want to perform on the displayed item.
The “Edit Form” zone shows the sections of the form which are currently displayed. You might not want to display all sections. You can uncheck sections in the “Edit Form” zone to have these removed from the form itself. When you click on Save or Update, not only is the data recorded but so are your “Edit Form” settings. The next time you return to the same form page, AceProject will only display the sections that were displayed when you last updated a similar item (user, project or task).
The chain icon allows one to grab the URL (or web address) of the current page. You may then share the link with another user who has the right to access the item. This is a convenient way to get another user to locate the information you wish to reference.

Comments

  1. Sara E Norbot

    My interface doesn’t look like this, why is mine limited and I can’t do anything like this?

    1. michael

      Please contact us at support (support@aceproject.com) and we could help you out further. If you are not viewing the left menu, it is closed by default and can be opened by clicking the left arrow near the top on the left edge.

Leave a Reply to Sara E Norbot Cancel reply